
微信视频号电子面单自定义区域操作指引
1.定义一个自定义模板的接口
访问该接口会返回自定义模板的HTML内容(参考:https://mmec-shop-1258344707.cos.ap-shanghai.myqcloud.com/shop/public/2023-11-10/a80c0110-3fb8-4190-bdcc-10124b7dd0ce.html) 注意:如果自定义模板的接口通过服务器ip访问,请设置端口号为80
2.自定义模板HTML参考代码 HTML模板参考如下(可根据实际需要增删标签,花括号中的变量名均可自定义,传参时需要对应上;具体长宽高等样式可通过标签的css样式进行修改):
<div>
    <head>
      <meta http-equiv="Content-Type" content="text/html; charset=utf-8" />
    </head>
       <!--标题-->
    <h5>
    店铺名称 {{ shopName }}!
    </h5>
       <!--列表-->
    {{#productInfo}}
    <div>{{name}},{{count}},{{code}}, {{{description}}}</div>
    {{/productInfo}}
       <!-- 文本 -->
    <p>{{testText}}</p>
       <!--图片-->
    <img src="{{imgSrc}}" width="300" height="50"/>
       <!--条形码-->
    <bar-code content="{{productBarcode}}" width="300" height="60" config='{"displayValue": true, "textAlign": "left"}' ></bar-code>
       <!--二维码-->
    <qr-code content="{{productQRcode}}" width="120" height="120" ></qr-code>
</div>
3.部署后复制模板链接
示例自定义模板地址: https://mmec-shop-1258344707.cos.ap-shanghai.myqcloud.com/shop/public/2023-11-10/a80c0110-3fb8-4190-bdcc-10124b7dd0ce.html
4.接口传参
对应入参应为配置模板时配置的变量名,入参参考下面示例(注:示例只提供了自定义相关的参数)
{
"customParam": {
        "shopName":"测试旗舰店",
        "imgSrc":"https://cdn.kuaidi100.com/images/all/print/shunfeng_logo.png",
        "productBarcode":"12345678",
        "productQRcode":"测试二维码内容",
		   "productInfo":[
		   	{
			"name":"苹果1",
        	"count":"1",
        	"code":"0001",
        	"description":"测试描述1"
			},
        	{
			"name":"苹果2",
        	"count":"0003",
        	"code":"12345",
        	"description":"测试描述2"
			}
		  ]
              },
"thirdCustomTemplateUrl": "https://mmec-shop-1258344707.cos.ap-shanghai.myqcloud.com/shop/public/2023-11-10/a80c0110-3fb8-4190-bdcc-10124b7dd0ce.html"
}
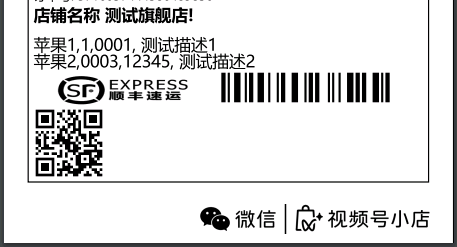
5.效果展示
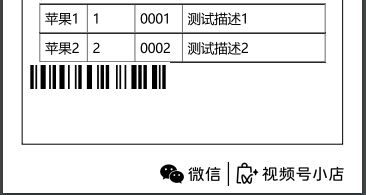
6.自定义表格 表格的样式相对于列表较为美观,如需自定义表格,参考如下。 示例HTML代码(其中表格的css样式,如单元格宽高可自行修改):
<div>
    <head>
        <meta http-equiv="Content-Type" content="text/html; charset=utf-8" />
    </head>
    <!--表格css样式-->
    <style>
        .tabletb{
            height: 60px;
        }
        .tabletb1{
            width: 100px;
        }
        .tabletb2{
            width: 300px;
        }
    </style>
    <!--表格-->
    {{#productInfo}}
    <table border="1" align="center" cellpadding="10" cellspacing="0">
        <tr>
            <td class = "tabletb tabletb1">{{name}}</td>
            <td class = "tabletb tabletb1">{{count}}</td>
            <td class = "tabletb tabletb1">{{code}}</td>
            <td class = "tabletb tabletb2">{{{description}}}</td>
        </tr>
    </table>
    {{/productInfo}}
    <!--条形码-->
    <bar-code content="{{productBarcode}}" width="300" height="60" config='{"displayValue": true, "textAlign": "left"}' ></bar-code>
</div>
部署后复制模板链接并传参,传参示例:
{
"customParam": {
       "shopName":"测试旗舰店",
        "imgSrc":"https://cdn.kuaidi100.com/images/all/print/shunfeng_logo.png",
        "productBarcode":"12345678",
        "productQRcode":"测试二维码内容",
		   "productInfo":[
		   	{
			"name":"苹果1",
        	"count":"1",
        	"code":"0001",
        	"description":"测试描述1"
			},
        	{
			"name":"苹果2",
        	"count":"2",
        	"code":"0002",
        	"description":"测试描述2"
			}
		  ]
},
"thirdCustomTemplateUrl": "此处填写部署后的自定义模板链接"
}
效果如下: